Seed starting basics
Seed starting can be a lot of fun. If you’re brand new to gardening, however, I’d suggest you wait a year or two before diving into starting seeds inside. There is some complexity to it and you’re better off sowing seeds outside and using nursery transplants to gain quick success. When you’re ready to dive in on starting your own seeds, this little guide is a great place to start.
Understanding these high-level principles of seed starting will give you the confidence to get started and the tools to be successful. Starting seeds can really save you some money and let you grow unique plants not widely available in nurseries. You can grow all sorts of things inside with a few simple tools and a little time investment. There is nothing quite as rewarding as watching those little seedlings emerge, grow and later move them to the garden. This subject is broad and a little further reading will be needed, but here are a few basics to keep in mind as you get started.
As an Amazon Associate I earn from qualifying purchases.
Seeds
Starting can save money and add variety for your annual flowers, herbs and vegetables. Perennials from seed take quite a bit more skill, so stick with annuals for now. Options include annual flowers, broccoli, cucumber, kale, lettuces, peppers and tomatoes. Basil is one of the easiest herbs to start from seed indoors. Crops like beans, beets, carrots, onion, peas, spinach and radish will do best sowed directly outside.
Have you fallen for the big lie that seeds expire after one season? Not true. That printed expiration date on the seed packets is a good way to sell more seeds. It really has nothing to do with their viability. Most seeds, if kept dry and sheltered from light, will remain viable for three to five years, in my experience. I may sow my seeds a bit more heavily in years three to five, but I honestly don’t think about it much. I sort through my seeds every few years and toss any older than five. If you’re really into being precise about it, you can test your seeds for germination. It isn’t difficult. There is a great deal more online about this topic.
Grow lights
Many people ask me if they can start seeds in a sunny window. Yes you can, but not very well. Conditions can’t be controlled and there simply isn’t enough light, regardless of how sunny that window is. Further, you’d spend a great deal of personal energy moving your trays around to grab that ideal light. You’ll find a lot more success by investing in some grow lights.
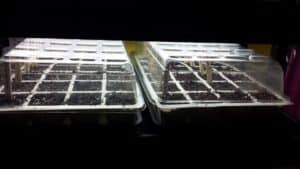
Two 40-watt bulbs in a standard fluorescent shop fixture would provide enough light to grow seedlings indoors, but I strongly encourage investing in LED grow lights. They are more expensive on the front end but their advantages are many. LED grow lights are more efficient, last longer and cost significantly less to operate than fluorescent options. Additionally, unlike fluorescents, they are non-toxic and mercury-free. I love these adjustable rope hangers made especially for hanging grow lights. Once you’ve caught the seed starting bug, you might consider treating yourself to this LED grow light system like I use at my house.
Lights should be no more than 4 to 6 inches above the seedlings. You will need the ability to change the light height as the seedlings grow. Light systems are available in store or online to aid in this effort. Lights should be on 12 to 14 hours a day. A timer is helpful to ensure proper lighting. The seedlings need to sleep just like we do!
Peat Pellets & Trays
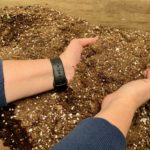
Something to grow your seeds in is essential. My favorite seeding solution is peat pellets. They can’t be beat for easy seed starting. As their name implies, they are quite literally small, rounded, compressed masses of dried peat moss. Peat moss is responsibly sourced sphagnum moss grown and harvested in peat bogs throughout Canada. It can be hard for new gardeners to comprehend growing plants in a soilless medium. It’s actually incredibly effective and most seed starting is done in a soilless mix. Peat is unique in that it can hold 20X its weight in water, provides perfect aeration for roots and help retain the nutrients plants need.
I use 50mm size peat pellets for my seed starting to allow my plants to grow longer and stronger in the peat pellet before I transplant them to a larger peat pot. Smaller size peat pellets are either 36 or 42mm in size and are great for starting herbs or flower seeds, however in my experience, those types of plants do just fine in my 50mm pellets. To hold my pellets, I use this reusable greenhouse kit every year, adding new pellets to the trays each year. Peat pellet packages come with instructions on starting your seeds, but honestly it is just as easy as soaking your pellets with water, letting them grow into a nifty little pot, pulling back the opening and planting your seeds. They already have fertilizer incorporated so you have everything you need to grow your seed successfully except the water and light which you provide.
Other seed tray options
Many varieties of seed trays are available online or at your local nursery.
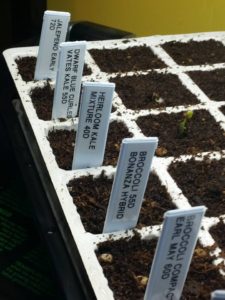
You can also use no-cost solutions like saved produce containers, milk cartons, paper cups or egg cartons to start your seeds. For any container, it is important that there are drainage holes in the bottom. Follow the directions on the seed packets for planting depth and don’t forget to label your seeded cells so you know what’s in your tray. These plant tags and marker do the trick.
It is common, and usually necessary, to transplant your seedlings at least once to a slightly larger container for a few more weeks of growing inside. For transplanting, I like to use peat pots. The advantage of peat pots is that you can plant these right into the garden without removing the plant from the pot. In fact, you’ll very likely have roots coming right through your pot when ready to plant. I usually tear the bottom of the pot a bit when I plant them into the garden to allow the roots to easily reach deep. The rest of the pot remains intact, completely planted into the ground. The pot will decompose naturally, limiting the stress on the seedling.
Growing medium
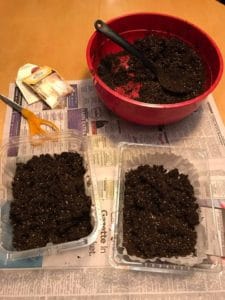
If you’re wanting to use traditional seed starting trays or recycled planting containers instead of a peat pellet system, you’ll need a soilless growing medium. Fancy phrase for dirt? Not quite. Seeds started indoors need a lightweight, clean, soilless seed-starting mix.
 Warmth
Most seeds require a consistent 70 to 75 degrees to germinate. I use a water-resistant heat mat made for this underneath my seed trays to ensure they stay warm and cozy.
Water
Germinating seeds need daily attention, consistent water and good drainage. An empty water bottle with holes poked in the lid with a pin makes the perfect mini waterer that seedlings love.
Clean
Wash any containers and tools in soapy water and disinfect them in a solution of 9 parts water to 1 part bleach before you begin. Keep your workspaces and supplies clean throughout your growing season.
When
The right timing is important so your seedlings are ready and well prepared to go into the garden. A few days of gradual acclimation to the outside in a protected area, a process known as “hardening off”, followed by planting in the garden, with close attention to moisture, will maximize your chances for a successful transition. Seed packets have a wealth of information to help you determine when to plant. Search “seed starting plan” online and you will find customizable plans to download. These plans utilize the last average frost date in calculations. This date is May 10 in my hometown of Cedar Rapids, Iowa, for example. Google your town’s last average frost date. I’m not kidding, try it and the info will pop right up. What did we ever do before having Google at our fingertips?
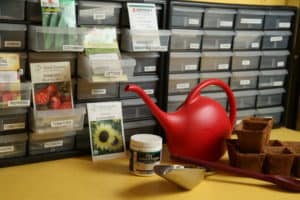
Easy Seed Storage
If you’ve dabbled in seed starting, or just fallen for the end-of-season clearance seed packet sale, you know how quickly your seed treasures can become a tangled pile of packet disorganization. Fear not, this quick and easy seed storage hack will have your future green babies back in order in no time.
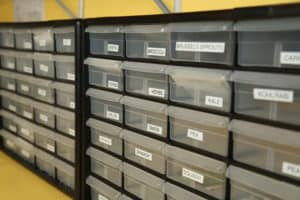
Grab a hardware storage container at your local home improvement store. The one featured here is 20 inches wide by 16 inches tall by 6.5 inches deep with drawers that are 4.5 inches wide by 5.5 inches deep. This size just happens to hold most seed packets perfectly. Grab a hardware storage container at your local home improvement store. The one featured here is 20 inches wide by 16 inches tall by 6.5 inches deep with drawers that are 4.5 inches wide by 5.5 inches deep. This size just happens to hold most seed packets perfectly.
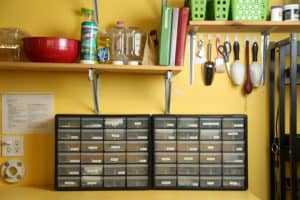 Use a label maker to label your drawers. You can screw your seed storage to a wall, but I like to set mine on top of a workbench in my basement seed starting area where I can move it or add more storage as needed. I’ve been using this super cheap method of seed keeping for years and can’t imagine trying to organize my seeds without it. The extra drawers come in handy to store other small-scale garden essentials.
 ![]()
You’re going to be tempted to install your cool new seed storage solution in your garage or shed. Don’t do it! I thought this was a great idea, too. That fall, I worked really hard to install my seed storage in my garden shed. Little did I know that all winter long, mice had taken up residence and were dining on a buffet of my carefully organized seeds. Imagine the carnage before me when I opened the door! Drawers were in various stages of open, closed or thrown on the floor with seeds – and more seeds – everywhere! The beautiful packets were shredded or gone all together. Take my warning seriously and choose a cool, critter-free area out of direct sunlight, ideally in your home.
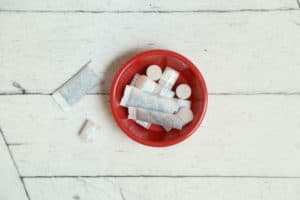
Keep those seeds dry
Your seeds aren’t going to fare very well if they aren’t kept dry. You know to choose a cool, dry spot, but did you know there’s more you can do? Have you ever wondered what those little cylinders that come in your prescription pill bottles are all about? Those plastic bottles contain a food-grade desiccant, or drying agent. These little guys take on any excess moisture to keep your pills dry, or in the case of this cheap trick, your seeds. That’s right, pop one of these in each of your spiffy new seed storage drawers and you’ll keep any humidity or invisible moisture out of your seeds.
Whether you’re new to growing veggies or just new to dabbling in seed starting, don’t be afraid to dive in! There is so much satisfaction when you see your first baby seedlings poke their heads out. As your seedlings grow and move ultimately from seed to harvest, you can say – I grew that!
SHARE IT ON PINTEREST